UPDATE: GIZDUINO EX Day 3 – May 10, 2014

Gizduino EX Arduino Microcontroller Programming Workshop ThinkLab EGizmo Workshop in Electronics Engineering and Programming

GIZDUINO EX : Three-Day Extensive Arduino Microcontroller Programming and Applications Workshop by ThinkLab

Good day participants!

GIZDUINO EX Day 3 this coming Saturday, May 10, 2014.

Our venue would be at E-Gizmo Mechatronix Central, 2nd floor VSC Building, 2313 Taft Avenue., Malate, Manila

Click here for map >> E-GIZMO Map

Entrance to 2nd floor of VSC Building

Landmarks: 

  • Beside One Archer’s Place Condo
  • Beside De La Salle Bro. Andrew Gonzales Hall

How to get there from EDSA:

  • Ride the MRT to Taft Avenue Station, last station
  • Ride the LRT-Line 1 station and drop off at Vito Cruz station.
  • Ride a jeep going to Quirino Station of LRT, drop off at VSC Building / One Archer’s Place
  • Or you can walk from Vito Cruz Station to E-Gizmo

How to get there from Cubao:

  • Ride the LRT-2 at Cubao – Gateway Station going to LRT-2 Recto Station, last station
  • Walk towards LRT-1 D. Jose Station from LRT-2 Recto via footbridge.
  • Ride the LRT-1 D.Jose Station and drop off at Vito Cruz station.
  • Ride a jeep going to Quirino Station of LRT, drop off at VSC Building / One Archer’s Place
  • Or you can walk from Vito Cruz Station to E-Gizmo

Things to Bring:

  1. PERSONAL LAPTOP – We require everyone to bring their own laptops so that they can work on exercises on their own. Required Specs – WINDOWS XP / 7 / 8 only, atleast 1GB Ram and with working USB ports.
  2. PEN and PAPER – for taking down notes.
  3. Last but not the least, yourself 😉

Other Details:

  1. Please bring your balance for the workshop fee on the workshop.

=================================================

Are you having a hard time working on your Research Project?
Do you need someone who has expertise to help you with your project?

Worry no more! Visit us at THINKCAFE now!

FREE CONSULTATION (on your first visit) **

Click here for more details >> https://thinklabph.wordpress.com/thinkcafe/

UPDATE GIZDUINO EX Day 2 – May 3, 2014

Homework Day1

Good day THINKERS!

Here’s our homework for the Day 2 of Gizduino EX.

  1. Try to make your LED array lighting direction change depending on which button was pressed.
  2. If LEFT button was pressed, run LED array to left. Print on Serial Monitor “Moving Left”.
  3. If RIGHT button was pressed, run LED array to right. Print on Serial Monitor “Moving Right”.
  4. If BOTH button are pressed, run both directions. Print on Serial Monitor “Crossover” 
  5. We will be giving a prize for those who can finish the assignment 😉

************************************************

DAY 2, VENUE: MUSHROOMBURGER, Katipunan, Loyola Heights, Quezon City 

View Map here >> To Mushroomburger

** We are so sorry, E-Gizmo is still under renovation so we will be staying at Mushroomburger for the meanwhile.

Hopefully, our graduation would be at E-Gizmo, Taft. 🙂

************************************************

THINKCAFE CONSULTATION

Are you having a hard time working on your Research Project?
Do you need someone who has expertise to help you with your project?

Worry no more! Visit us at THINKCAFE now!

FREE CONSULTATION (on your first visit) **

Click here for more details >>https://thinklabph.wordpress.com/thinkcafe/

UPDATE: GIZDUINO EX Day 1- April 26, 2014

Gizduino EX Arduino Microcontroller Programming Workshop ThinkLab EGizmo Workshop in Electronics Engineering and Programming

GIZDUINO EX : Three-Day Extensive Arduino Microcontroller Programming and Applications Workshop by ThinkLab

DATE: April 26, May 3 and 10, 2014

Workshop Outline:

  • Introduction to the Arduino Microcontroller platform
  • The Gizduino Microcontroller
  • Interfacing Fundamentals
  • Arduino C language
  • Serial Communication
  • Digital Input/Output
  • Advanced Digital Input/Output
  • Interfacing with LCD Display
  • Analog Input/Output
  • Analog to Digital Conversion (Analog Input)
  • Digital to Analog Conversion (Analog Output)
  • Interfacing with Motors
  • Using Wireless Communication devices
  • Using the Bluetooth Shield
  • Demonstration of Arduino Based Projects of ThinkLab

=================================================

For those who are still interested to attend the workshop, we only have 3 slots remaining.

Just email the following details to secretariat@thinklab.ph with the Message Subject : Gizduino EX April 26 – Registration

  1. Full Name
  2. School / Company
  3. Year&Course / Position
  4. Mobile Number
  5. Email

Learning Investment for the workshop is Php 7,500.00.

Inclusive of:

  • Lunch for 3 days.
  • Basic Gizduino Kit
  • Certificate of Completion
  • Software and soft copy of exercises and handouts

=================================================

Good day participants!

We now have a venue for our workshop, GIZDUINO EX Day 1 this coming Saturday, April 26, 2014.

Our venue would be at Mushroomburger, 297 Katipunan Avenue, Loyola Heights, Quezon City

Mushroomburger Katipunan Three-Day Arduino Workshop ThinkLab Arduino Workshops Gizduino EX ThinkLab Workshop Extensive Arduino Microcontroller Programming and Applications Workshop ThinkLab Workshops in Electronics and Engineering

**Please disregard the EMO person outside the store, this is what Mushroomburger looks like.

Landmarks: 

  • Across Ateneo de Manila along Katipunan Ave.
  • Beside National Bookstore and Starbucks
  • Near Ateneo Footbridge

Location Map of Mushroomburger Katipunan

How to get there from Philcoa:

  • Ride a jeepney from Philcoa going inside UP Campus and alight at Vinzons Hall. (Fare = Php 8.00)
  • Look for the Katipunan jeepney station beside Vinzons Hall or just ask around.
  • Ride the Katipunan jeepney and alight at Mushroomburger Katipunan beside Starbucks, National Bookstore and Ateneo footbridge. (Fare = Php 8.00)
  • Click here for the driving route >> Philcoa to Mushroomburger Katipunan

How to get there from Cubao:

  • Ride the LRT-2 at Cubao – Gateway Station and alight at Katipunan Station (Fare = Php 12.00) 
  • OR, ride a jeepney at Cubao Gateway and alight at Katipunan Avenue Footbridge (Fare = Php 8.00) 
  • Walk towards the UP – Katipunan jeepney station.
  • Ride the jeepney to UP Campus and alight at the first footbridge from the station, Ateneo Pedestrian Entrance. (Fare = Php 8.00) 
  • Cross the footbridge and you’ll find Mushroomburger.
  • OR, you can walk from LRT-2 Katipunan Ave station / Footbridge to Mushroomburger, just stay on the left side of the road so that you would not need to cross the footbridge. (5-10 minute walk)
  • Click here for the driving route >> Cubao to Mushroomburger Katipunan

Things to Bring:

  1. PERSONAL LAPTOP – We require everyone to bring their own laptops so that they can work on exercises on their own. Required Specs – WINDOWS XP / 7 / 8 only, atleast 1GB Ram and with working USB ports.
  2. PEN and PAPER – for taking down notes.
  3. Last but not the least, yourself 😉

Other Details:

  1. Please bring your balance for the workshop fee on the first day of the workshop.
  2. Be ready to meet new friends as you will be teamed up with other participants to provide a conducive environment of learning and collaborative work.

=================================================

Are you having a hard time working on your Research Project?
Do you need someone who has expertise to help you with your project?

Worry no more! Visit us at THINKCAFE now!

FREE CONSULTATION (on your first visit) **

Click here for more details >> https://thinklabph.wordpress.com/thinkcafe/

GIZDUINO EX – April 26, May 3 and 10, 2014

GIZDUINO EX – April 26, May 3 and 10, 2014

Gizduino EX Arduino Microcontroller Programming Workshop ThinkLab EGizmo Workshop in Electronics Engineering and Programming

Good day THINKERS!

We invite you to an AWESOME Learning Experience at THINKLAB’s GIZDUINO EX! 

Learn how to program your very own GIZDUINO Microcontroller (Arduino-based) and use it together with different components to create your very own ARDUINO project!

Here at ThinkLab we always emphasize having FUN while LEARNING! So, come and join us in this 3-day Weekend Workshops and have some FUN FUN FUN while you LEARN LEARN LEARN!

For more info contact us at our numbers >> https://thinklabph.wordpress.com/contact-us/

** Gizduino Blink Challenge for Participants (Application: Running Lights, Traffic Lights, LED Indicators)

************************************************

Are you having a hard time working on your Research Project?
Do you need someone who has expertise to help you with your project?

Worry no more! Visit us at THINKCAFE now!

FREE CONSULTATION (on your first visit) **

Click here for more details >>https://thinklabph.wordpress.com/thinkcafe/

Gizduino Weekend Projects #1

It’s been a long time since we last posted here in our blogsite. Sorry, we’ve been busy with other stuff. Don’t worry, THINKLAB.PH blog is now back! Stay tuned for more updates from here onwards.

As for now, just take a peek on how we play with our Gizduino. We’ll be posting more and more projects soon! 😉

************************************************

Are you having a hard time working on your Research Project?
Do you need someone who has expertise to help you with your project?

Worry no more! Visit us at THINKCAFE now!

FREE CONSULTATION (on your first visit) **

Click here for more details >>https://thinklabph.wordpress.com/thinkcafe/

ISM Project Making Workshop with ThinkLab

HELLO THINKERS! WAZZUP!?

Do you want to have your own Weekend Project Making Workshop with ThinkLab?

You know what to do! Just contact:

Mark @ 0916.686.0420 or EMAIL us at secretariat@thinklab.ph

and let us know your interest to have a weekend project workshop on your school or company!

We’d love to see and guide you in your own weekend projects!

Here are some projects from ISManila!

Have an AWESOME evening!

Tagisang Robotics 2013

Tagisang Robotics 2013

AWESOME AFTERNOON THINKERS! 

Last thursday, you have seen our post of the Tagisang Robotics basic mobot as shown below. But you may have not noticed what ThinkLab’s up to for the Tagisang Robotics 2013.

Here are the pictures again and look at what the captions are saying.

#TAGISANG ROBOTICS BASIC MOBOT

** LOOK AT THOSE GREEN BOARDS AT THE BACK OF THE MOBOTS, THINKLAB MUST BE UP TO SOMETHING.. HMMMM…

** LOOK AT THE WHITE BOX BEHIND THE CONTROLLER, I WONDER WHAT’S INSIDE. HMMMM..

The ThinkLab team is preparing for the TAGISANG ROBOTICS COMPETITION 2013 : GAME REVEAL that will happen on AUGUST 28, 2013, WEDNESDAY at the NATIONAL INSTITUTE OF PHYSICS, UNIVERSITY OF THE PHILIPPINES – DILIMAN, just a stone’s throw from our office. ** This is partial and unofficial, please wait for the OFFICIAL ANNOUNCEMENT FROM DOST

TR_LOGO_ copy


For the teams who are joining the competition, are you ready with your AWESOME CHEERS? I hope your ready, cause we’ll be watching you guys!

WE ARE EXCITED AS MUCH AS YOU ARE!

Let’s get this competition going! Woohoo! Go go go Robotics teams! 

Please stay tuned to our blog to get more updates from THINKLAB!

Please also LIKE our FACEBOOK PAGE >> https://www.facebook.com/thinklab.ph

SEE YOU AT THE GAME REVEAL! 

The gizDuino Fundamentals: Getting Started (Windows and Mac)

The gizDuino Fundamentals: Getting Started (Windows and Mac)

Greetings fellow Thinkers!

Engineer Nico here, at your service. Resident Thinker and go-to guy. If you’ve attended any of our workshops, I might have assisted you or taught you a thing or two about the very awesome Arduino microcontroller system and how to use its twice as cool “cousin”, the gizDuino.

I’ll be a regular contributor here on the ThinkLab.PH blog. I’ll be sharing tips and tricks on using your gizDuino, as well as technical guides for popular projects and electronics stuff I get to tinker and play with. I’d love to know the current obstacles you are facing in your projects, and the specific topics you have in mind that you’d want us to feature. Head on over to our Feedback page and Say Hi! Feel free to pour your heart, and thoughts, out!

====================

Picture1As for my first post, I’ll be starting a series that caters to our budding Thinkers. The gizDuino Fundamentals will cover the basics of using and handling the gizDuino, as well as the tried-and-tested techniques employed in designing microcontroller-based systems. For the total novice, the gizDuino is a locally available Arduino clone. They are electronics prototyping platforms based on flexible, easy-to-use hardware and software. They have the ability to control interactive objects and environments, and has limitless potential to do so.

If you have attended our workshops, you most probably received your very own gizDuino. Drop us a message if you are interested to own one, or a few, because I’m very sure you’ll get hooked once you get to play with it. If you’re near the Taft – La Salle area, you can visit e-Gizmo Mechatronix Central instead – the birthplace of gizDuino and all of its awesome peripherals.

So you might be wondering, “A clone? I want the real thing!” Do not fret young padawan, they are one and the same, with a few minimal changes here and there. This series aims to point out and clear up these slight differences, providing a definitive user’s guide exclusively for our homegrown gizDuino.

This episode deals with starting up your gizDuino hardware with the Arduino IDE – the platform’s programming utility. It runs on Windows, Mac OS X, and Linux, although I haven’t experienced it first-hand on a Linux machine. For all operating systems, it only takes four simple steps to enable your computer to run your gizDuino.

  1. Download and install the latest version of the Arduino IDE
  2. Download and install the compatible USB driver for your computer
  3. Download the gizDuino patch and apply to the IDE
  4. Launch the IDE, plug in via the USB cable, and program away!

We’ll run them down step-by-step, taking note the subtle differences between Windows and Macintosh machines.

STEP 1: Download and install the latest version of the Arduino IDE

The Arduino IDE is free to use and can be downloaded here. Pick the latest, stable release. As of this writing, the latest version of the IDE is 1.6.12. Also, make sure to choose the right package for your machine.

For Windows users, two packages are available. A binary (*.exe) one and a compressed archive (*.zip). I personally suggest the latter, as you can easily modify your IDE and share this modified version with others or between different computers by re-compressing it back. Install/Extract as needed.

For Mac users, choose the lone option. Double-clicking the file installs and executes the IDE on your system. If the IDE is open at this stage, close it first.

STEP 2: Download and install the USB driver

One of the differences between Arduino and gizDuino is the USB interface chip. Arduino uses FTDI, its corresponding drivers made available inside the IDE package. For gizDuino, PL-2303 is employed instead. Don’t worry though, the drivers for this chip is made available for us on the web.

For Windows users, download your PL-2303 driver here. Note that the chip series is not fully supported by Windows 8 systems. The IDE will still run and you can use it normally, however you might experience erratic and inconsistent behavior. If this occurs, a solution for this is to ask e-Gizmo if they can replace the current chip to a PL-2303HXD (revision D).

For Mac users, download your PL-2303 driver here. This package is for OS X 10.6 and above only. For older OS X versions, or if the package fails to install, download the one here instead.

STEP 3: Download the gizDuino patch and apply to the IDE

For convenience, all the other particulars needed by the IDE to interface with the gizDuino has been collected and sorted out by e-Gizmo and is packaged into a single *.zip file. Download it here as a *.zip file by clicking on File > Download or the keyboard shortcut Ctrl+S. It will contain a single folder named gizduino-

For Windows users, extract and paste the gizduino- folder inside the hardware folder found in the IDE directory. The exact path is …\yourPCdirectory\arduino-1.6.12\hardware\. Refer to the picture below for a visual sample.

Untitled

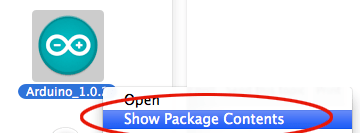
For Mac users, extract and paste the gizduino- folder inside the hardware folder also found in the IDE directory. The path however is different. Look for Arduino.app in your system, usually on the desktop or in your Applications folder. Right-click on it and select ‘Show Package Contents’. This enables you to explore the IDE directories.

Arduino_forum_145765b

The exact path is Contents > Resources > Java > hardware. The contents of the folder after pasting the patch will be the same as the one in Windows.

STEP 4: Launch the IDE, plug in via the USB cable, and program away!

But before we can do so, we need to pick the correct board type and Serial Port. On the IDE toolbar, click on Tools > Board. The different gizDuino boards should be listed there. Choose the appropriate one for your board. This process is the same for both operating systems, choosing the correct Serial Port however is different.

Picture1q

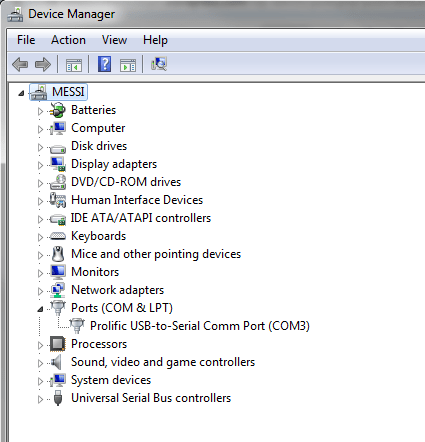
For Windows users, corresponding port numbers are assigned for each of your USB ports, and many of them might show up in Tools > Serial Port. Open the Device Manager to view which port is assigned to the gizDuino. You can access the Device Manager by right-clicking on My Computer > Properties > Device Manager.

Untitled

For Mac users, simply pick /dev/tty.usbserial in Tools > Serial Port. Note that most of the time, a Network Preferences window will show up during programming. You can simply ignore this by closing the window, or confirm (Add) so it will not bother you again.

gizduino-serial

All of these steps have been tested extensively with Windows 7 and OS X 10.8 running an Arduino IDE 1.6.12. It has also been tested on Windows 7 using IDE 1.6.12. Give us a shout out in the comments section below if you’re encountering problems when following our procedures. See you in the next episode!

The Arduino Revolution

Massimo Banzi, one of the makers of the Arduino, talks about how the Arduino took over the world like a storm through its Arduino Community.

Want to join the Arduino Revolution? Contact us now! Click here >> SAY HI!

LIKE our Facebook Page to view more AWESOME stuff! Click here >> THINKLAB.PH FACEBOOK

Featured Thinker: Ringo Dingrando

Hi everyone!

We will be featuring some of the people we met during our workshops especially those who have been thinking of ways on how to use the knowledge they acquired during our workshops in their everyday lives.

These are the people who have been inspired by ThinkLab to INNOVATE!

For those who have attended our workshops, you may also create your own videos and articles and send your links to us.

Please fill up this form >> SAY HI!  and send your links in the message box.

We hope to feature more THINKERS in our blog.

Have an INNOVATIVE day everyone!

=============================================

This is Ringo Dingrando, a Physics and Robotics Instructor from International School Manila. He attended one of our workshops last January 2013. Today he sent us a link of his video of one of his projects using Gizduino. Thank you Ringo and we hope to see your energetic and ecstatic video posts of your projects soon!

Subscribe to his Youtube Channel here >> RINGO’s YOUTUBE